No cement is used without any cement tests. It is an inherent process of cement production as wells as the construction process.
Cement is one of the widely used material in the world. It is very rear to see a construction without using this material. Limestone, shells and chalk or marl combined with shale, clay, slate, blast furnace slag, silica sand and iron ore are used to make the cement.
Physical and chemical properties of the cement are tested as per the standards to make sure they are within the limits. Frequency of testing and the number of cement tests are based on the relevant guideline (code) or the technical specification. Mostly, during the construction, physical properties of the cement are tested. Seven cement tests can be identified most frequently tested as a measure to control the quality of the cement.
- Fineness
- Compressive strength
- Heat of hydration
- Initial and final setting times
- Soundness
- Normal Consistency
Background and basic technical information about each cement tests are discussed herein.
FINENESS TEST ON CEMENT
Piratical size of the cement is directly affecting the strength of the concrete. Finer partials react very quickly than the comparatively large particles. Further, fine cement has a greater surface area and hence faster the development of strength. There are two methods of testing of fineness of cement
- By sieving
- By determination of the specific surface area
Following standards and methods are more commonly used when testing of fineness of the cement.
- AASHTO T 98 and ASTM C 115: Fineness of Portland cement by the Turbidimeter.
- AASHTO T 128 and ASTM C 184: Fineness of Hydraulic Cement by the 150-mm (No.100) and 75-mm (No. 200) Sieves
- AASHTO T 153 and ASTM C 204: Fineness of Hydraulic Cement by Air-Permeability Apparatus o AASHTO T 192 and
- ASTM C 430: Fineness of Hydraulic Cement by the 45-mm (No. 325) Sieve.
In sieving test, a sample of having 100mg is taken and it is continuously passing for 15 minutes through standard BIS sieve no. 9. The weight of the remaining cement is measured. It should not be more than 10 percent of the original weight.
The specific surface area of cement particles is calculated from permeability apparatus test. This test provides a better answer when it compared with the sieve analysis test. Further, it provides an idea about the uniformity of fineness. The specific surface of cement should not be less than 2250 cm2/gm.
NORMAL CONSISTENCY TEST OF CEMENT
Normal consistency or standard consistency is the optimum percentage of water content required for a cement paste. Normal consistency if the percentage of water by weight of cement that required to produce cement past showing the penetration of plunger with diameter 10mm by a value of 10mm±1mm below the original surface in 30 seconds after being released.
Testing of the normal consistency could be done based on BS 12 or ASTM C-187-04 with the help of Vicat apparatus. Cement sample have 500g (as per BS12) and clear water is used for the test.
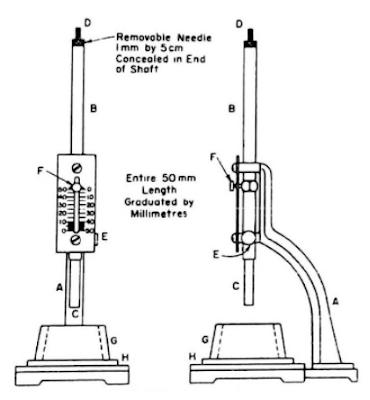
Vicat Apparatus
Following procedure is followed when testing the consistency
- Mix 500g of cement from a known amount of water and make a cement paste as per the standard procedure
- Place cement paste on the ring of the Vicat apparatus and remove the excess cement paste with the help of the trowel
- Make the plunger end with the surface of the past and tight the set screw
- Set movable indicator to upper zero marks of the scale or initial reading could be taken. Then release the rod immediately. Releasing of the rod shall be done within 30 seconds after completing the mixing.
- No movements are allowed for the apparatus and it shall be free from the vibrations.
- Paste shall be of normal consistency when the rod settles to a pint 10mm±1mm below the original surface in 30 seconds after being released.
- Make trials until normal consistency is obtained.
- Based on the experiments done, the percentage of the water to be added to obtain the normal consistency is about 22-30 percent of the amount of cement.
TESTING OF INITIAL AND FINAL SETTING TIME OF CEMENT -Cement Tests More Related to Construction
When cement is mixed with water, a stiff and sticky paste is formed. Cement past remains plastic for a short period of time and its plasticity gradually reduces. Finally, it becomes a solid mass. This phenomenon, which is cement past becomes solid form plastic stage, is known as the setting of cement.
Setting time of the cement is divided into two parts. They are initial setting time and the final setting time. The time at which cement starts hardens and completely loses its plasticity is called initial setting time. The time at which cement completely loses its plasticity and become hard is the final setting time of cement.
Water cement ratio, temperature and relative humidity, fineness of cement and chemical composition of cement are the factors that affect the setting time cement. Testing of the setting time of the cement can be done with the Vicat apparatus. Setting time can be determined based on ASTM C 191 or BS EN 196-3:2005.
Following procedure could be followed to find initial setting time as stipulated in BS EN 196-3:2005
- Place the filled mould and base-plate in a room or humidity cabinet that has the recommended humidity.
- Position the needle of the Vicat apparatus in contact with the paste
- Slowly release the needle to avoid initial velocity or forced accelerations of the moving parts.
- Then release the moving parts quickly and allow the needle to penetrate vertically into the paste
- Read the scale when penetration has ceased, or 30 seconds after the release of the needle, whichever is the earlier.
- Record the scale reading, which indicates the distance between the end of the needle and the base-plate, together with the time form zero.
- Repeat the penetration test on the same specimen at conveniently spaced positions, not less than 10mm from the rim of the mould or from each other, at conveniently spaced intervals from time, e .g. at 10min intervals.
- Vicat needle shall be cleaned immediately after each penetration.
- Record the time measured from zero at which the distance between the needle and the base-plate is (4±1) mm as the initial setting time of the cement to the nearest 5mm.
The following procedure can be followed to determine the final setting time of the cement paste
- Invert the filled mould used to determine the initial setting time. The tests for the final set are made on the face of the specimen originally in contact with the base-plate.
- Set the needle with a ring attachment to facilitate accurate observation of small penetrations. The same procedure discussed for testing of initial setting time could be followed in this test also.
- Intervals of time between penetrations, tests may be increased to e.g. 30 minutes.
- Test shall be done at the specified humidity
- Needle shall be cleaned immediately after each test
- Record, to the nearest 15 min, the time measured from zero at which the needle first penetrates only 0.5mm into the specimen as the final setting time of the cement.
TESTING OF COMPRESSIVE STRENGTH OF CEMENT – Cement Tests Connet with Production
Compressive strength of the cement is a very important factor as the basics we used concrete to carry the compressive loads. Compressive strength of the cement is directly related to the strength of the concrete.
Cement tests on compressive strength can be done as per the procedures specified in standards ASTM C 109 or BS EN 196-1-2005. Testing of cement as per the BS EN 196 Part 01 is discussed in this section. Following procedure could be followed when testing cement.
- Prismatic test specimens having dimensions 40x40x160mm are used
- Specimens are cast from a batch of plastic mortar containing 1:3 mix proportion of Cement: Sand (standard sand). Water cement ratio is maintained is kept at 0.5
- Each batch for test specimen shall consist of 450±2 g of cement, 1350±5 g of sand and 225±1 g of water.
- Mortar is prepared by mechanical mixing and compacted in the mould using standard jolting apparatus.
- Specimens are kept in a moist environment for 24 hours and then demoulded specimens are stored under the water until testing
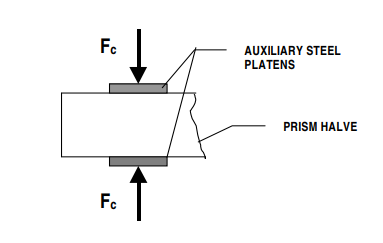
- At the time of testing, specimens are broken in flexure into two halves and each half tested for strength in compression. The following figure indicates the testing arrangement
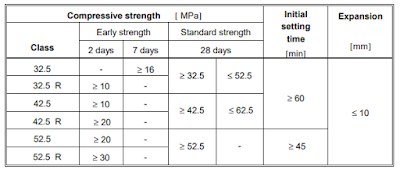
Strength of the cement shall be with the values given in BS EN 196-Part 01. The following table indicates the strength requirement based on the class of cement.
TESTING OF HEAT OF HYDRATION Of CEMENT
The heat generated in the hydration process is called the heat of hydration. The heat of hydration is mostly influenced by the proportions C3S and C3A in the cement. In addition, water-cement ratio, fineness of cement and curing, placing temperature, etc. also affected to the heat of hydration of the cement.
Testing of the heat of hydration can be done as per the BS EN 196-8: 2010 by solution method or BS EN 196-9:2010 by semi-adiabatic method. In addition, procedure stipulated in ASTM 186 could also be followed.
TESTING OF SOUNDNESS OF CEMENT
The ability of a hardened paste to retain its volume after setting is known as the soundness of cement. A cement is said to be unsound if it is subjected to delayed destructive expansion. The expansion could be due to hydration of uncombined calcium oxide and/or magnesium oxide. The soundness cement tests are carried out from Le Chatelier apparatus. Following procedure is followed with testing the soundness as per BS EN 196 – Part 3.
- The test shall be carried out on two specimens simultaneously from the same batch of cement paste.
- Prepare a cement paste of standard consistency
- Place a lightly oiled Le Chatelier mould on the lightly oiled base-plate and fill it immediately without undue compaction or vibration using only the hands and a straight-edged implement, if desired, to level the top surface.
- During filling, prevent the split in the mould from accidentally opening e.g. by gentle pressure with the fingers or by tying or by use of a suitable rubber band.
- Cover the mould with the lightly oiled cover plate, add the additional mass, if necessary, and then immediately place the complete apparatus in the humidity cabinet.
- Maintain it for (24±0.5) hours at (20±1) 0C and not less than 98% relative humidity.
- Measure distance between the indicator points to the nearest 0.5mm at the end of the (24±0.5) hours.
- Then heat the mould gradually to boiling during (30±5) minutes and maintain the water-bath at boiling temperature for 3h±5 min.
- Distance between the indicator points may be measured to the nearest 0.5mm at the end of the boiling period
- Allow the mould to cool to (20± 2) 0C. Measure the distance between the indicator points to the nearest 0.5mm.
- For each specimen calculate the difference measured in Step 10 and Step 7.
- Calculate the mean of the two values (two specimens) to the nearest 0.5mm
CHEMICAL ANALYSIS OF CEMENT
The chemical analysis could be done as per the BS EN 196-2:2013 or by any other applicable standard. Availability different chemicals, the content of the chemical will be evaluated. For example, determination of pure silica, determination of soluble silica, determination of total silica, etc. can be tested for knowing the contents.
Similarly for other materials such as Aluminium, iron, magnesium oxide, calcium oxide, etc. can be tested. All the determinations can be done as stipulated in BS EN 192-2.
Summary of Limitations for Cement Tests
| Name of Test | Specified Values for the Strength Class of 42.5 N as per BS EN 197:2000 |
| Setting TimeInitial Setting TimeFinal Setting Time | ≥ 60 minutes- |
| Soundness(Le-Chatelier Method Expansion of the cement | Not more than 10mm |
| 2 days Compressive Strength28 days Compressive Strength (N/mm2) | ≥ 10 N/mm2≥ 42.5 and ≤ 62.5 N/mm2 |
| Loss of Ignition | ≤ 5.0 % |
| Insoluble Residue | ≤ 5.0 % |
| Chloride (as Cl–) | ≤ 0.1 % |
| Sulphate (as SO3) | ≤ 3.5 % |
Refer to the article cement and cement additives for more information on cement.